Signable’s Electronic Signature Generator: Advanced features

Published:
Signable’s electronic signature generator can benefit you and your business in many ways. It will save you time and money, as well as allowing you to do your bit to help the environment (especially now that we’re putting a percentage of our savings towards removing CO2 from the atmosphere!)
But now it’s time to level up. It’s all well and good having a Signable account, but if you’re not properly leveraging all its fantastic features, what’s the point?
So we’re here to tell you about some tips and tricks which will help you streamline your processes and will allow you to start seeing the real benefits of our electronic signature generator.
Let’s get started.
Prefillable fields
This one’s a huge time saver, and also adds that extra touch of personalisation for your clients. It’s a way of prefilling your templates so that every time you send it to someone new you can personalise it to them.
So how do they work?
- First you go into your templates
- Click on whichever template you need
- Add the appropriate fields in there
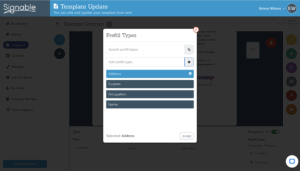
- You will then have the option to “assign” prefillable fields, which will allow you to state what type of field it is, for example “name”, “occupation”, or whatever you choose.
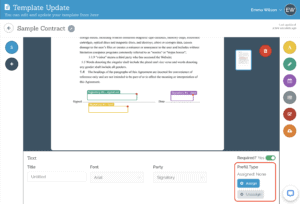
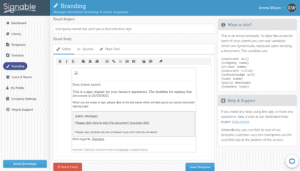
Then, when you go to actually send this template off, you will automatically get the option to fill in whichever fields you made prefillable yourself, as shown below.

Then your signatory will receive a document that already has some of their details filled in, making it more personal to them!
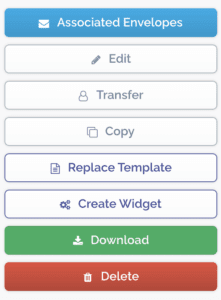
Setting up widgets
If you have a standard form that you get all your customers to sign, you’ll be able to save a bunch of time with the widgets feature. All you need to do is send them a link to the signing page, or you can embed it directly on your website. Sounds good, hey?
- First off you head to your templates
- Click on whichever template you need a widget for
- Click “create widget”, and you’ll see the embed options or the direct URL link which you can send to your clients.
If you need any more information on widgets, check out this help article.
Pre-formatting a document with field tags
Another really useful time-saving technique is to pre-format your document with field tags before even uploading it to Signable. The system will then automatically grab these tags and replace them with the relevant fields (signature, date, text, file upload, and checkbox).
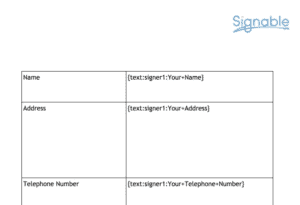
Your tags should always follow the “what:who:name” format, for example: {signature:signer1:Please+Sign+Here}.
For more information on tags, have a read of this article.
Customising your email templates
Last but not least, this feature allows you to personalise the emails your clients receive from Signable. While the branding feature is super useful to add your own company colours and logo to your emails, you also have the option to customise them further.
Under the branding tab, you’ll find all the email templates that will be sent out to your clients. Click on any one of these and it will let you edit the whole email, complete with variables such as “company name” and “contract title”.
Don’t let me keep you any longer, head over to your Signable account so you can start noticing the benefits of all these great features.